Radio Mobile 'Quick Start'
I can be contacted at E-mail address:-
![]()
Radio Mobile 'Quick Start'I can be contacted at E-mail address:-
|
|
|
This page describes the background for the 'Base Network' generated by my installer (available Here). Details on reconfiguring to your own location can be downloaded HERE. Para la versión española de la reconfiguración - Haga clic AQUI.
The page also describes how to move the Map area to your own location anywhere in the world - and also modify the Network to meet your own requirements. The major advantage of using my installer is that it generates and sets up all the internal program links required to produce a working network on screen. This can easily be modified and moved to your own location as described below and in the linked pdf above.
It is worthwhile reading through this page to gain an insight into the operation of Radio Mobile and explore its functions on my installer 'Base Network'.
Introduction:- I found that when introducing my friends to Radio Mobile, that they had difficulty in setting up their first map and network to obtain an initial working display. The following is a description of a simple network setup, complete with a complimentary set of self-installing files (which includes the required height - SRTM - data) to produce my Base network. For those of you who don't believe that Ashbourne is the centre of the world, you can enter your own Latitude and Longitude data in the 'Map Properties' pane (F8) to give your local map after installing my 'Base' network, with the program downloading your new SRTM data from the Internet as required. See the Notes section and the 'Base Network Settings' page or this link to help 'Changing Location' and for extra information and hints on some shortcuts. The 'Map Properties' pane also has a 'Select City Name' button, which enables the automatic entry of Lat/Long data for that City as the new map centre point. To see where the settings for the Base Network are made, open the 'Base Network Settings' page.
I have also produced a second page 'Once you get going' which shows how extra Units can be generated, and other pages showing some of the facilities available from the Radio Link window, and how to perform Radio Coverage Plots. This page is available in .pdf format (654Kb) here, but may not show the most recent version of Radio Mobile in the screenshots. It is worth browsing this and the following page to explore some of the many facilities available from within the program.
A further page showing how to 'Find Best Sites' for a radio repeater network is also available, and another feature is a 'Route Radio Coverage' facility. This enables the performance of a fixed station to mobile station link to be evaluated in either direction as the mobile station traverses your predefined route.
Note: This program uses the 'WGS-84 datum' Latitude & Longitude data for position location.
My Radio Mobile Illustrated Handbook... 350 pages of reference and 'How to' data in 19 chapters. Click here for more information!
y con un 10% de descuento si usted compró una versión en idioma inglés.
Also just released: the Radio Mobile Handbook Companion 184 pages of illustrated Tutorial text. This takes you through the Handbook chapters by using supplied Networks with descriptions which enable you to generate all the plots shown in the Handbook! Click here for more information! Handbooks can be requested from HB-Sales@g3tvu.co.uk
UK users - please note that this is different to our Ordnance Survey OSGB-36 datum! Jeff, G8HUL, has written a NGR Converter which shows UK National Grid Reference coordinates, and also an Irish Grid converter available from the above link, which work from the cursor position of RM. He also provided a stand alone Lat-Long converter for NGR/WGS-84 conversions.
(Look at my Importing Pictures page showing the use of Gartrip for other National coordinate conversions). (As an alternative for conversion from OSGB-36 to WGS-84 datum try http://www.nearby.org.uk/coord.cgi)
First:- There are a number of concepts which need to be understood when setting up and running the program. A radio station is referred to as a Unit, there can be numerous Units defined to operate within a given Network. Each different type of Unit used in a network has to be defined with a separate Radio Operating System specification, this sets up the radio parameters for that type of unit, i.e. Transmit Power/receiver sensitivity/antenna gain/antenna height/cable losses. Thus each Unit will be allocated to an operating Radio System specification within the network. Finally, all units are given a Role, which is either Command, Subordinate or Rebroadcast. The effect of this is to set which links are shown on the network display - in my case, Base is specified as command, and all other Units as Subordinate - so links are shown between Base and the other Units only. Links between other pairs of stations can still be evaluated via the 'Radio Link' pane.
Don't forget :-
1 Program setup. For old versions of Windows, and Linux machines running Wine, first download Visual Basic Runtime (Service Pack 6) from Microsoft (VB6.0-KB290887-X86.exe) from here. This has to be installed on your machine by a double click on the file name after downloading, before any other files are installed. This may require a system reboot after installation, but the file can then be removed.
I have produced the file 'Radio Mobile Setup.zip' which is an installation file, in zip format, generated by freeware. This freeware only generates an information pane after completing the installation process which can be exited, it doesn't add anything else to your computer. It will generate a new folder to hold your Radio Mobile files at 'C:\Radio Mobile'. This location can be changed** if required during the installation, and a desktop icon shortcut for the program will be generated. An uninstall function is also present. See below for a 'Walk Through' of the installer panes.
** It is recommended however, that the folder above is used for the installation, as all internal program links will have to be changed to make the program operate from a different location!
Thanks to Roger and the use of his RMW.ini file, my installer sets up all the data paths below to their required default locations, but it is advisable to check that they are in place to become more familiar with the available setup options. There are no changes or additions made to the computer registry. If you make the installation to your own Folder location, you will have to modify these data paths to reflect this using the panes as shown on the Base Network Settings page. The changes required are shown in the *Blue notes.
It is possible to
install Radio Mobile Manually without using my installer, but in this case you
will need to generate your own file and folder structure - and also set up all
the internal program links before you have a working program. If you prefer this
approach it is still worth looking at the 'Base Network Settings' page above to
see what settings are required, and also look at my
There is also a link to Roger's Download page to gain access to the current files.
Please note that with VISTA, you have to have Administrator privileges, and change the Security settings to allow full control and modification of RMW.ini - the setup file.
2 Download my exe file. My exe file (in zip format ~ 3.7MB) contains all the data required for my 'Base' Network and Roger's system files, this should be downloaded, unzipped, and run with a 'double click'. The height data is contained in the file named 'N53W002.hgt', which will be placed in a new folder called 'SRTM3' in the Radio Mobile folder . This SRTM3 folder will be used to hold all additional downloaded 3-arcsecond data for your area later - i.e. located at 'C:\Radio Mobile\SRTM3'. Ensure that no other instances of rmwdlx32.dll exists on your system. If you want to put the program at more than one location, you should put rmwdlx32.dll in C:\Windows\System - (C:\Winnt\System32 for NT).
These files are correct at the 18th December 2016 with version 11.6.6
Note: My installer generates the English Language version of the program, for Arabic, Brazilian Portuguese, Chinese, Danish, Dutch Flemish, Farsi, French, German, Greek, Italian, Norwegian, Polish, Russian, Spanish and Turkish language versions see Roger's Download page.
To modify my installed files to another language, extract the language version you prefer into the Radio Mobile folder, then delete any files with '***eng' as their name - you will also have to point the program shortcuts to your new language version ***.exe!
My 'Radio_Mobile_setup.exe' file is available here in zip format
3 Installing Radio Mobile.
Extract 'Radio Mobile Setup.exe' from its zipped file, and a double click on it will start the installation process.
To activate the 'Merge' Internet download links from GoogleMap, MapQuest and Virtual Earth, the file 'Map_Link.txt' has to be viewed. This file contains links to the legal requirement for access to, and use of, the data from these servers. If you agree to the conditions, you can modify and save the file as per the contained instructions which will provide access. The file resides in the root of the Radio Mobile folder. During installation you have the option to view the file, and if you agree to the terms, you can modify and save it before completing installation.
For a 'walk through' of the installation pane sequence, click here for the 'Installation' page.
(Use Back, or the link to return) 'Up' shows the Contents page.
After installation, the shortcut for 'Radio Mobile'
Open the program with a 'double click' on this shortcut, (or from Start/Programs/Radio Mobile), and the Radio Mobile window will open showing my 'Base' network (title \base.net).
There are three panes displayed showing part of the UK Peak District which are:- a) 'base.jpg' which is an elevation map to which 10m Contours and Distance scale have been added, kept in the picture, then *merged*/multiply with another picture, 'base bw.jpg', and saved. b) 'base bw.jpg' a downloaded Road map which has been modified to remove detail and changed to Black & White. c) 'Base aerial.jpg' which is an aerial photograph of the map area downloaded from the internet.
(* For more information on Merging
Pictures see
This has now produced the working Network!
The working Base Network consists of three Units configured in a VHF network - a Base Unit, a Mobile Unit and a Hand Held Unit. The actual operating parameters used for these different radios are shown in their respective Radio Operating Systems - these can be examined on the 'Base Network Settings' page.
The following actions give a quick view of some features available in this working network after enlarging a picture to Full Screen:
If you don't see a particular icon on the Toolbar, open 'Options/Toolbar' (or right click on the toolbar) to open a Tool selection pane. This pane and the function of the various icons can be seen on my Toolbar Icons page.
Use these quick links for additional information - using your browser 'Back' button to return here - or just browse down the page.
To view the Radio Network on the map, click on the Toolbar Icon:
The Units and network radio paths will be displayed. The radio path colour indicates each radio link performance, with Green for signals >= +3dB ref. the Rx threshold, Yellow for signals in the range of +3dB/-3dB, and Red for signals <-3dB relative to the Receiver threshold. These threshold levels can be modified if required from the Style settings, as shown on Network Styles.
To view the Units only on the map, click on the Toolbar icon:
and the units will be shown at their locations on the map or picture
To move a Unit Left click on the new location required to generate a red crosswire cursor crossing point, and then right click on the Unit to be prompted to move it to the cursor position.
To examine a Radio Link
Using 'F2' or a click on the Radio Link icon,
(or using Tools/Radio Link), will open the Radio Link pane, showing the path profile and parameters between selected Units. (See the Radio Link page for more information on the features available).
It is now a worthwhile exercise to see where information is available, and can be changed for this Network to make it match your own requirements. Click this link to examine the 'Base Network Settings' page, and then go to 'Once you get going' to find out how to move, rename and add additional Units. If you wish at this stage to move the map to your own location see the 'Changing Location' page. To explore many of the other features available from within Radio Mobile, these are described on the RM Contents page and available from there, or by the buttons below.
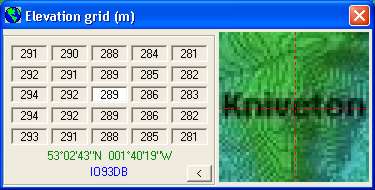
Elevation Grid There are many shortcuts available in the program which need to be explored. Clicking on a map produces the Elevation Grid centred on the red cross wire cursor position, if it does not appear, check 'View/Elevation grid' or click on the the Toolbar Icon
The red crosswire cursor can be moved on screen by using the keyboard arrow buttons, or a click in an elevation grid box height window will also move the cursor to that position.
A click on the small arrow button at the lower right of the Elevation Grid display, opens an enlarged view window of the area round the cursor cross point - the cursor coordinates are also displayed.
A 'Right Click' on any unit produces a prompt to move the Unit to the Cursor position - or a 'Left Click' produces the 'Unit Properties' screen.
Changing Location: See my 'Changing Location' page here If the map area/location is changed (You will also have to change the 'Options/Internet' - 'Internet FTP directory' address if you are located outside of Eurasia!), and the original files are to be retained, remember to save all files using 'Save as' under a New Name including the Network, or the original files will be overwritten. After producing a new map, click where you wish to place the Base Unit to produce the red cross wire cursor, then open 'Unit Properties' and click 'Place Unit at Cursor position' to place it on the map. Repeat for the other Units before saving the Network. (It is worthwhile checking the window panes under 'Window' and closing any of my original 'base network' windows remaining before saving the Network under your new name).
All the unit Systems, names and locations can be changed to suit your own requirements by using the windows shown on the Base Network Settings page.
Area Zoom A 'Left Click and drag' on a map produces a marquee box, then a right click in this area enables a zoom of the area to be produced which can be saved as a 'New Picture'. This picture then can be merged with new data from the source at higher resolution, then saved if required. (For more information see the Merging Pictures page).
S Unit settings S-Unit values can be modified in the 'Options/S-Unit' window, which I use as the IARU Region 1 Standard.
Base Net Format This Network was produced at 800x600 pixels, and pictures saved in ***.jpg format to reduce file sizes. The reason for my Base Station being located at the bottom of the map is to have all the units on one SRTM tile - where I live requires four tiles for the Base unit to be centralised!
Maps Map Properties can be changed to suit, with a size to over 2000 pixels square (dependant on your computer capability), and Lat/Long changed for your location. The Black and White road map is a very useful tool for coverage and Field Strength plots, as rainbow elevation colours - or sometimes greyscale - can obscure the colour changes.
World Map Opening 'View/World map' will show a map where the required map centre can be selected. Using 'View/Swap World map' will then show a road map of the UK - a double click on a location on either map opens up 'Map Properties' with the cursor cross wire Lat/long entered. This enables the map area to be moved - but see Changing Location for a full description. This alternate UK map can be changed for one of your own region by replacing Wmap.jpg (or in .bmp format) in the root directory, but retain the same names - or disabled by removing or renaming them.
Program Help Files If you wish to look at the program Help files for additional information, they are available on the RM Downloads page in .pdf format, or can be viewed here as web pages:- Program Help Files
Extra folders The Base Network specific files are contained in a folder 'C:\Radio Mobile\Networks\Base Network', and two additional empty Network Folders (2 and 3) are also available for use in this Network folder. By using these separate folders for each network, the network files and pictures are kept away from the program files, and similar names for pictures can be utilised without conflict. Additional empty folders for DTED and all other data have been produced in the Radio Mobile folder, which need to be navigated to via the 'Internet Options' window if you haven't used the default folder location. A folder called 'Icon' is available in which you can place additional icons that the program will access to represent Units. This folder is in the root of the Radio Mobile folder and contains many icons which can be changed or added to if required. An additional SRTM1 folder has been added for use if 1-arcsecond data is to be used. This has to browsed to on the 'Options/Internet/SRTM' tab when a 1-arcsecond source is selected. The second level of data shown on the 'Map Properties' pane is set to this folder which can be selected if required. Similarly SRTM0.3 is the folder available for one-third arcsecond data where available. Custom Antenna patterns If the selection of Antenna pattern files (contained in the 'Antenna' folder) do not suit your requirements, there are spreadsheets available on the RM Downloads page to generate your own - but also see Antenna Plots for a description on how to use them.
Installing 'Radio Mobile Setup.exe' will produce a working network with all the settings made as the screenshots shown on the Base Network Settings page - this has been used successfully on many other computers, so should work on yours!
Problems? If you used my Installer with its default folder location all internal links would be established correctly. But, please go through this check list to make sure:-
1) Is the correct Elevation Data Path set up in Internet Options? Check from Base Network Settings
2) Is the correct Data path set up in Map Properties? If your machine freezes, make sure that 'Ignore Missing Files' has been checked.
3) Can't get a Map when changing Location? Make sure you are connected to the internet and check 'Internet Options'.
4) No Units? Make sure that you have all required units enabled in both Network and Unit Properties. Use 'Move Unit to Cursor position' in 'Unit Properties' to place units on your map locations.
5) Can't get rid of my network? When you have generated your own network, cycle through all the windows, closing those which don't apply to it. Then save the map, all pictures and network using your own new names.
6) You can see the QRA locator reference and require another reference - see Notes.
7) If you are unable to 'merge' pictures from external sources read this 'Important Note'.
8) To permanently remove a Unit from the Unit Properties pane, select the Unit and click the 'Clear' button. This places the Unit at Lat=0° and Long=0° where it is ignored, then rename to Unit **.
This page is available in .pdf format here
If you have any other Queries, or Suggestions for improving this Guide, please post them to me at web@g3tvu.co.uk
Finally, after reading all this, I hope it will help you start to explore the capabilities of Radio Mobile, and realise what a great program Roger has produced and released with continuous support for our benefit!
Please keep checking back for updates/additions.
© Copyright G3TVU 18th December 2017
|
 Para el
Handbook
Para el
Handbook